IoT dive in guide for a web developer
Intro
This guide is aimed to help a bored web-programmer to kickstart a journey towards projects that can materialise their code in the real world. If you have no understanding of embedded software development and you are a person like me, the person who always wanted to see your creations alive not only in web browser but also in the 3D space around people in the appearance of physical things then this guide is for you.
Fortunately for us, the progress in Internet Of Things devices development is lowering the barriers for enteting this field. One of the opportunities to get there is by using ESP32 with MicroPython. The System on Chip ESP32 contains all the necessary ingredients to give us a plenty of peripheral features to sense the world and make things move. It has the ability to talk to other devices and web services over the Internet securely, as it has WiFi and Bluetooth on board and hardware acceleration of encryption algorithms. And the most important thing - ESP32 is powerful enough to be programmed with a high-level programming language Python1?. That means you can dive in even without learning such nightmarish languages for a web developer like C or C++. This System on Chip ( SoC ) is a perfect mix of features for the best price. So, let’s get started!
Getting a development board
The first thing you will need is a development board with ESP32. The development board surrounds ESP32 with a convenient and developer-friendly interface. It allows you to forget about power supply or “how to plug this into my laptop?!” questions. Enough of tiny Input-Output pins of the chip are connected to the easy to use contacts where you can hook up sensors or motor drivers with wires.
Contrarily, in the mass production of ready-to-sell applications, manufacturers buy thousands of ESP32 modules or chips2? and solder them directly to the boards created for their specific needs, but you do not have to care about this until you are launching some product to a market.
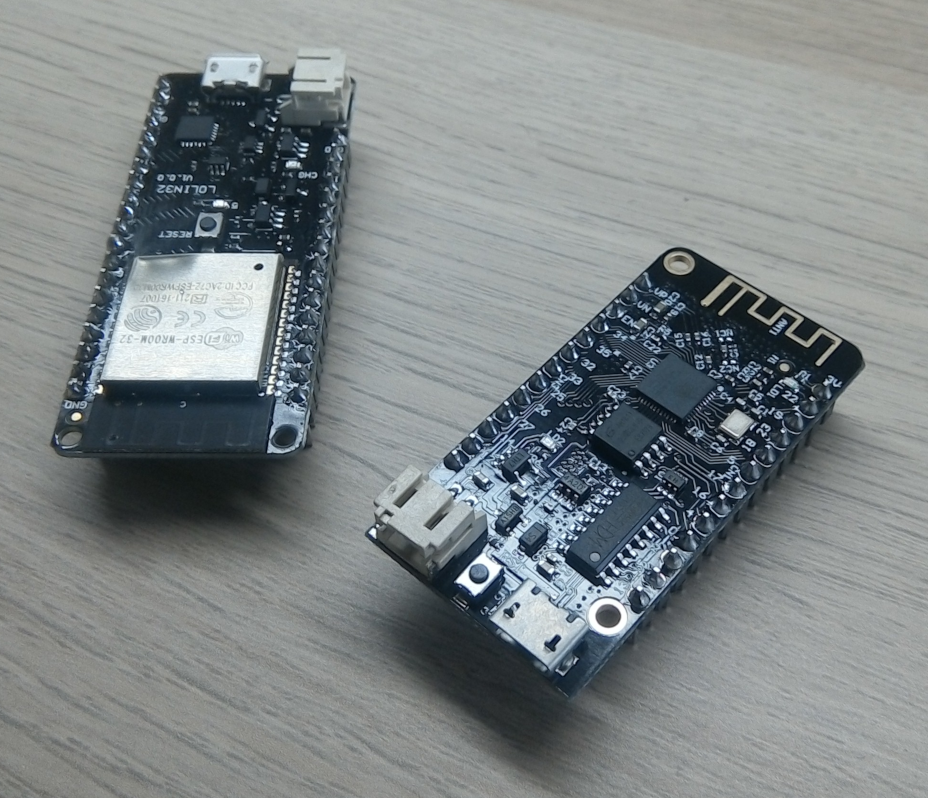
Here is how the development boards I bought look like. Wemos Lolin32 on the left and Wemos Lolin32 Lite on the right. These are not expensive boards, you can get them for the price as low as 5$ on eBay or Aliexpress. Initially, I was reluctant to try them, but I have not experienced any problems so far and I will not be afraid to let them go into the wilderness of the streets as I can buy bunches of those. Also, the crucial benefit of the boards from Wemos as they are shipped with MicroPython installed that lets you write your first IoT code really fast. I recommend you to order Wemos Lolin D32 or Wemos Lolin D32 Pro
To try out your Wemos board you will also need a micro USB type-B cable. It is not necessary, but I highly recommend ordering some Arduino starter kit3?.
Connecting
The following instructions worked for me on Ubuntu 16.04 and they should work on other distributions4?. Please let me know if you need help with installation on another OS, I’ll try to help you.
The first thing you’ll need to do is to find the port where the board is attached.
Plug in the board and type dmesg in your terminal
This command shows the messages produced by connected devices’ drivers. Find the message similar to this at the end of the output
1 | [149958.239334] usb 1-1: Product: USB2.0-Serial |
you need the part with ttyUSB. In my case it is ttyUSB0. Copy it.
Next, type in the terminal pip3 install rshell 5?. rhsell is a remote shell terminal for MicroPython board. The tool allows you to control it, launch REPL ( developers console ) and upload scripts. Now we will use the rshell to connect to the board:
1 | rshell -p /dev/ttyUSB0 # replace ttyUSB0 with yours if it's different. |
If you receive an error saying “permission denied” that means your user does not have an access to serial port. To fix it you need to assign the user to dialout group. Usually, it is something like sudo usermod -a -G dialout <USERNAME>. Try to connect again.
If you see Welcome to rshell. Use Control-D to exit. then you are in now. Congratulations as you are going to write your first code for a thing in few minutes!
Using REPL
The easiest way to start playing with the board is by using REPL. Type repl in the terminal, you should see >>> characters at the beginning of the line.
Let’s try to light up a LED. Please type in the following lines, do not copy and paste them as it might not work, I’ll cover later how to paste some code in.
1 | from machine import Pin # Pin is a class to interact with pins on your development board it is an abstraction behind every contact of your board |
This is actually an amazing part. When you use a low-level language like C or C++ you can not write it like this through a developer console. Every change you make should be re-compiled and re-uploaded to the board. But with MicroPython we can type the code directly, it saves a lot of time and brings much more joy through rapid experimenting.
Copying in code
The next thing you will learn is to easily copy and paste chunks of code. To enter the paste mode press CONTROL+E on your keyboard while you are in the terminal, then you can copy the code from here and paste it, then press CONTROL+D to finish
1 | from machine import Pin, TouchPad |
After pressing CONTROL+D you should see no error message, instead, your REPL should start dumping some output from the script that shows the read value from the sensor and state of the LED PIN. Now, try to firmly touch the contact number 32 on your board with your fingers. Do not worry, it will not kill you as the voltage is tiny. If your board comes without soldered pinhead, you can use the unsoldered one or other piece of conductive material to touch the contact. You should see the LED is lighting on while you are touching the contact.
As you have already noticed ESP32 can recognize touches on some of its contacts and we configured one of them to understand when it’s being touched.
This is all cool, but if you restart your board at this point then you’ll have to copy paste everything again, as REPL does not store the code on the board. In order to make your board executing your program right after launching, you should copy the code to the Flash memory. It is easy to do with a command through rshell.
Uploading code to the board
- Create
main.pyfile with the code from the above example - If your REPL session is still running then click
CONTROL+Xdouble times - it will return you back to the rhsell. From the rshell session by usingcdget to the directory with the file and typecp main.py /pyboard/ - Restart the board either by clicking the
RESETbutton on it or by pressingCONTROL+Dfrom REPL - Try to touch it now
This is one of the ways how you can upload the code in there. In the next section we’ll explore more.
Toggle LED through the network
Finally, we can get to the connectivity. Let’s make the device accessible in your WiFi network with some simple web page that controls the LED.
The WiFi module can be configured in two modes. The first mode is access point mode. In this mode your laptop or smartphone should be connected directly to the ESP32. This can be used when an IoT device should be configured initially. But this is not a good idea for regular interactions with the thing because we would need to disconnect from your WiFi that gives you Internet access, then we would need to connect to the thing, control the thing, and connect back to the WiFi.
There is another mode that is much better for the interaction - station mode which connects your IoT device to your WiFi router, gets an IP address in your network and therefore is available from any laptop or smartphone in the local network. I’ve made a very basic example illustrating this approach.
Download the files from my repository and use rshell to upload the code to the board. As there are many files, the best way to do it now is by typing from the rshell session
1 | cd ~esp32-examples/upy/led_toggle_by_wifi |
Launch REPL and write start('ssid of your wifi router here', 'the password'). You should receive the IP address in your local network, open it in the browser.
After this step you should know the IP address and it is possible to edit config.py to make the board connecting to the router without the REPL, every time it powers on.
Make sure you run help in rshell to learn more about all available commands.
What’s next?
That’s it, you’ve learnt everything for a brief start! What’s next? Grab your components box and try to connect them to the board, feed the data to the Web, let your friends control light in your room remotely, do whatever you want.
Hardware part will bring you a whole new world. There will be some learning but it is not a rocket science, there is a plenty of tutorials and books around. Just remember one important thing, you are not going to design complex electrical schemes, you rather will be looking for existing documented components, reading their documentation, buying them and sticking them together with DuPont cables on the BreadBoard, even without soldering. You can think of this as searching for an NPM or Python package or Ruby gem. So you will definitely be able to handle it.
In the future, you will be able to use this board with Arduino IDE, or with native Espressif Toolchain if you need to code in C/C++. It is possible to do by erasing the flash memory and burning there the corresponded firmware. Luckily the process is reversible, so it is possible to change the firmware without any hassle.
The need in giving up on MicroPython can appear in the case if you just want to try C/C++, or if you run into the limitations imposed by MicroPython. The limitations can arise in two cases. The first one is when MicroPython does not support some library for a board you would like to use for your project or for ESP32 itself. It is pretty likely to happen as MicroPython is maintained by an open-source community. And I have already faced with some issues while I was creating the WiFi example. For unknown for me reason, the board gets unresponsive when I try to swith the LED state. This happens quite often when the board is not connected to the REPL and is getting power from a power bank. Or another issue is sometimes it does not want to connect to my router, several reboots by pressing reset button on the Wemos board help.
The second case is when you have to optimise for speed and memory as MicroPython is much more greedy for the resources than C/C++ toolchain. Wemos D32 Pro could mitigate it slightly as it adds 4MB of external RAM to the 520KB embedded into ESP32 by default.
I personally hope to use Wemos Lolin D32 board and MicroPython with my robotics projects.
Please subscribe on my twitter and drop me a message there if you have any questions or want to know when I’ll post something new. See you there, happy coding and keep learning!
Tips
MicroPython
[1] MicroPython is a lean and efficient implementation of the Python 3 programming language that includes a small subset of the Python standard library and is optimised to run on microcontrollers and in constrained environments. Here is the MicroPython website and reference.
Chips and Modules
[2] ESP32 is sold by the manufacturer in form of a chip or a module. A module has the ESP32 inside and also may contain other stuff like additional thermal protection, antenna and so on. For more information, documentation and datasheets check their website.
Starter KIT
[3] Starter KIT is a box containing electronics components that will supply you with materials for further exploration and projects. You can find it on your own it does not really matter what’s inside the box just make sure there is a Bread Board, Male-Female Dupont Wires, some Resistors, LEDs. LEDs matrixes, boards with sensors, buzzers, microphones, TFT touchscreens motors - pick anything you would like to play with. There is no real need to spend much time searching for “good stuff”, anything should work for you at the beginning level as you are just figuring out is this hobby for you or not. If you have a hackerspace nearby consider taking your board there most likely there will be a community, tools and ideas.
Other OS
[4] Windows users, sorry, you will have to dig the internet for the instructions on your own, you could also consider this guide or if you have RaspberyPi you could use it to do the following steps as well.
pip
[5] Python and pip should be included in the majority Linux distributions, but if you don’t have it there are many instructions available in the Internet.